Contents
Imagine you’ve just come home to discover your basement flooded from a burst pipe, with water threatening to damage the structure and your cherished belongings. You’ll need to act quickly, employing the best techniques for mitigating water damage and drying out your property effectively. From using high-powered extraction tools to strategically placing dehumidifiers, each method you choose plays a crucial role in preventing further damage and restoring your home. But what are the other essential techniques you should consider, and how do they work together to ensure a thorough recovery? Let’s explore these critical steps further.
Key Takeaways
- Rapidly extract water using submersible pumps and industrial vacuums to prevent secondary damage.
- Employ advanced drying techniques like dehumidifiers and targeted air movers to ensure thorough moisture removal.
- Clean soot and smoke residue using HEPA filter vacuums and specialized cleaning solutions to mitigate material deterioration.
- Implement structural assessments and removal of charred materials to maintain building integrity and safety.
- Utilize thermal imaging and moisture meters to identify hidden moisture and ensure complete drying of affected areas.
Assessing the Extent of Damage
When facing fire or water damage, your first step is assessing the extent of the destruction. You’ll need to carefully evaluate each area affected to understand the full scope of the damage. This initial damage assessment is crucial for your peace of mind and for facilitating the insurance claims process effectively.
Start by documenting everything. Take photos and make detailed notes of all damages. This documentation is essential for your insurance claim and will serve as your evidence of the condition post-disaster. It’s not just about snapping pictures; you need to capture the specifics: the discoloration, the charring, the warping, and any other signs of damage.
Next, engage a professional who specializes in damage assessment. They bring expertise in identifying both the obvious and the subtle effects that mightn’t be immediately apparent to you. This expert will give you a more accurate picture of the situation, which is incredibly important.
You’re not just looking for a quick fix; you’re looking for a restoration plan that addresses all the damage comprehensively. This professional assessment will also help streamline your insurance claims process.
With a detailed and expert-backed report, you can approach your insurance company confidently. You’re not just presenting problems; you’re providing documented facts, which can significantly influence the speed and outcome of your claims process.
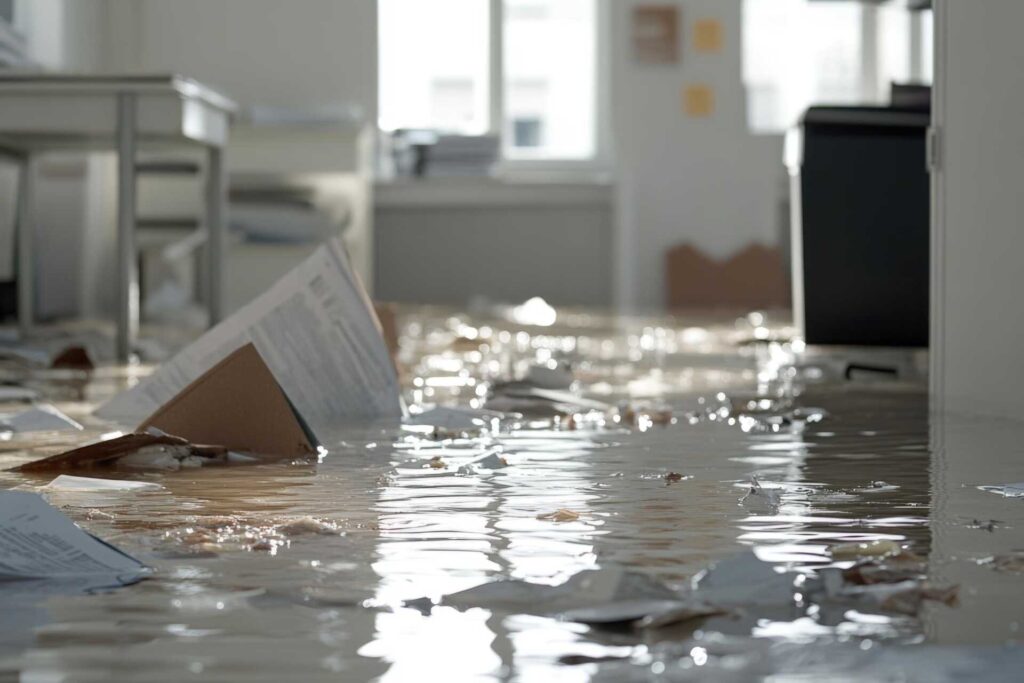
Immediate Water Removal Techniques
After assessing the damage, your immediate focus should switch to removing any standing water. This is a critical step, as water can continue to damage structures and create ideal conditions for mold and mildew.
You’ll want to initiate the water extraction process quickly using professional-grade equipment. Submersible pumps and industrial wet/dry vacuums are essential tools in this phase. These devices efficiently suck up water, reducing drying time and mitigating further water damage. Remember, the faster you remove the water, the less chance there’s for ongoing damage.
Integrating an emergency response plan that includes water extraction helps you tackle the situation effectively. Ensure you have contact with a reliable water damage restoration company that can dispatch teams immediately to your location. These professionals come equipped with the necessary tools and expertise to handle significant water volumes, ensuring a thorough and urgent response.
Next, focus on smaller areas where water may have seeped into carpets or between floorboards. For these, use portable extraction units. These are crucial for accessing tight spaces and help prevent secondary water damage.
Throughout this process, keep safety in mind. Ensure all electrical equipment is turned off and avoid areas where water may have compromised structural integrity.
Your proactive steps preserve your property and create a sense of community and shared responsibility in facing such challenges.
Advanced Structural Drying Methods
Typically, once you’ve removed the standing water, it’s crucial to implement advanced structural drying methods to prevent further damage and restore the integrity of your property. Advanced structural drying isn’t just about drying out the wet spots; it’s a comprehensive approach that ensures your space is thoroughly dry, minimizing the risk of mold growth and structural issues. As part of this process, you’ll use cutting-edge techniques like thermal imaging and dehumidification systems.
Thermal imaging cameras are essential as they help identify the areas that are still wet without the need to dismantle or disrupt the structure unnecessarily. These cameras detect temperature differences, revealing moisture pockets that might not be visible to the naked eye. Once these areas are identified, targeted drying can commence.
Dehumidification systems play a pivotal role, too. These systems aren’t just about removing moisture but are crucial in maintaining an optimal humidity level to prevent additional moisture from seeping into the building materials. Here’s a quick guide to understanding these components better:
| Technique | Purpose | Benefit |
|---|---|---|
| Thermal Imaging | Locates hidden moisture pockets | Prevents unseen water damage |
| Dehumidification | Reduces moisture in the air | Halts further moisture absorption |
| Targeted Drying | Focuses drying efforts on specific, critical areas | Enhances efficiency & saves time |
Soot and Smoke Residue Cleaning
Once the primary concerns of water damage are addressed, your next focus should be on thoroughly cleaning soot and smoke residue. This step is critical, as soot and smoke can cause ongoing damage to surfaces and leave a persistent odor if not properly handled.
You’ll start with soot removal. Soot is acidic and can etch into various materials if left untreated, deteriorating your possessions further. To effectively remove soot, use a vacuum with a HEPA filter to capture the fine particles without smearing them across surfaces. Avoid direct contact with the soot-covered areas to prevent grinding the particles into the fabric, paint, or wood.
Next, address the smoke odor that often lingers after a fire. This isn’t just about comfort; it’s about the health of everyone in the space. Smoke can penetrate deep into porous materials such as upholstery, carpets, and drapes, requiring deep cleaning.
For hard surfaces, cleaning with a solution specifically designed to neutralize smoke odor is essential. Don’t forget to replace all HVAC filters that have been exposed to smoke to prevent recirculating the harmful particles.
For fabrics, consider hiring a professional service that specializes in fire damage restoration. They’ve the equipment and expertise to ensure that odors aren’t just masked but are truly removed.
Engaging in thorough soot and smoke residue cleaning restores your home and reclaims the sense of sanctuary your space provides.
Preventing Mold and Mildew Growth
Addressing soot and smoke is vital, but your restoration efforts should also focus on preventing mold and mildew growth. After a fire, water used in extinguishing the flames introduces moisture into your environment, which can become a breeding ground for mold if not addressed promptly. Mold prevention isn’t just about cleanup; it’s about strategic moisture control to safeguard your home and health.
Firstly, ensure thorough drying. Use commercial-grade dehumidifiers and fans to accelerate the drying process. It’s crucial to monitor these areas with moisture meters, ensuring that all materials return to appropriate dryness levels. Remember, visible dryness isn’t enough; materials can still retain moisture within.
Next, inspect and clean HVAC systems to prevent the spread of mold spores through air circulation. Replace filters and consider professional duct cleaning. This will help maintain clean air throughout your property and prevent airborne mold from taking hold.
Additionally, apply antimicrobial treatments to areas prone to moisture. These treatments provide a protective barrier that inhibits mold growth on surfaces. Focus especially on porous materials such as wood and drywall, which absorb moisture more readily and are more susceptible to mold.
Furthermore, maintain vigilant moisture control going forward. Regularly check potential problem areas like basements, attics, and bathrooms where high humidity levels can promote mold growth. Installing moisture barriers and ensuring good ventilation can significantly mitigate these risks.
Incorporating these mold prevention strategies into your restoration plan helps in recovery post-fire and ensures a healthier living environment. By taking proactive steps towards moisture control, you’re not just rebuilding; you’re fortifying your home against future mold issues.
Recap
Now that you’re armed with the ultimate arsenal of fire damage and water-drying methods, you’re practically invincible against the ravages of these elements! Remember, promptly removing water and employing advanced drying techniques are your first line of defense. Tackling soot and ensuring your space is mold-free are crucial for maintaining a fortress of health and safety. Follow these steps meticulously, and your property will not just recover—it’ll thrive, standing stronger than ever!
Recent Posts
What Are Emergency Water Removal Services?
Imagine water pooling in your living room, threatening to damage your cherished belongings and compromise
How to Remove Water From Flooded Basements
Flooded basements affect nearly 14 million homes in the U.S. each year, making effective water
Your Guide to 24/7 Emergency Water Damage Repair
Did you know that the initial 48 hours after water damage are critical in preventing