Contents
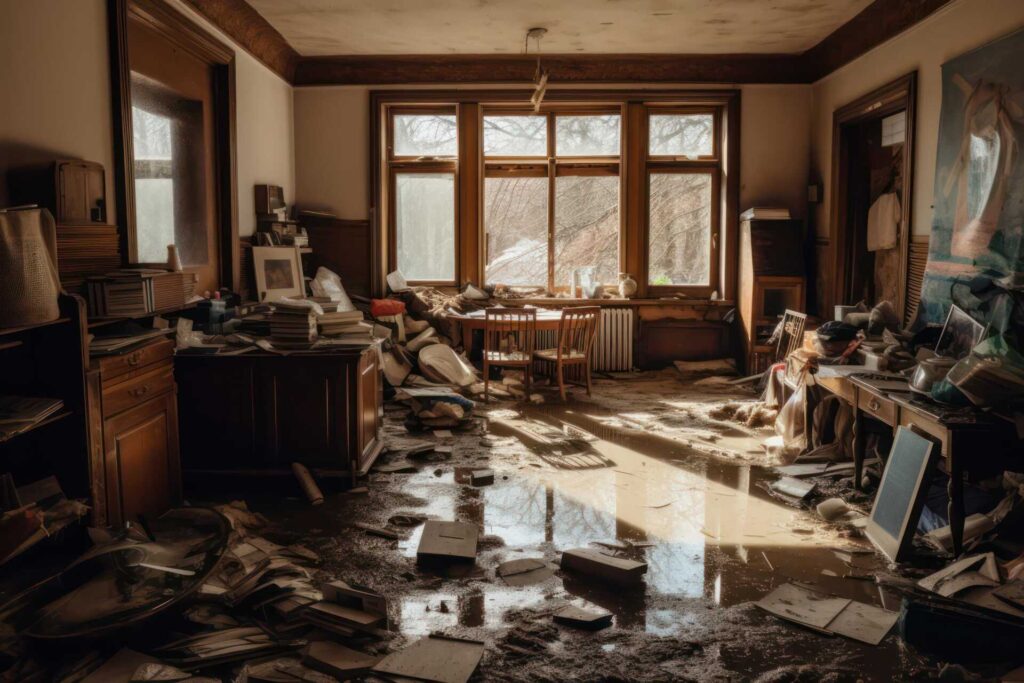
You might not know that the first 24 hours following a flood are critical in preventing lasting damage to your home and possessions. As you face the daunting task of post-flood damage recovery, it’s crucial to act quickly and strategically. Start by ensuring your own safety and assessing the structural integrity of your building—these are just the initial steps in a series of actions designed to efficiently restore your space. The process involves several less obvious yet vital tasks that can significantly impact the effectiveness of your recovery efforts. Let’s explore what these actions are and how they can help you mitigate the consequences of flood damage.
Key Takeaways
- Assess safety before entry, checking for structural issues and smelling for gas leaks.
- Document all damage thoroughly with photos and detailed lists for insurance claims.
- Begin immediate water removal using pumps and wet/dry vacuums, then dry areas with dehumidifiers and fans.
- Clean and disinfect all surfaces with soap and a bleach solution to prevent mold and bacteria growth.
- Contact your insurance company to report the damage and initiate the claim process.
Assess Safety Before Entry
Before you re-enter your home after a flood, it’s crucial to ensure it’s safe. The emotional pull to check the extent of damage is strong, but your safety is paramount.
Start by assessing the structural integrity of your home. Look for visible signs of damage, such as cracks in the foundation or caved-in roofs, which can pose serious risks.
Next, take necessary safety precautions before stepping inside. Wear sturdy boots and gloves to protect yourself from sharp objects and contaminated water that may still be present. Don’t forget a flashlight, as the power should remain off until an electrician confirms it’s safe to turn it back on.
Once at the doorway, pause and smell for natural gas or propane leaks. If you detect any unusual odors, don’t enter. Call your utility company from a safe distance away.
It’s also essential to listen. Sounds like shifting or unusual creaks might indicate that the structure is unstable. If the door sticks at the top as you try to open it, this could be a sign that the ceiling is ready to collapse. In such cases, it’s best to retreat and seek professional help.
Document the Damage
Once you’re safely back on your property, start by capturing photographic evidence of all visible damage.
You should also itemize lost or damaged property, noting descriptions and estimated values for insurance claims.
Lastly, gather and record repair estimates from reliable contractors to understand the financial impact and plan your recovery effectively.
Capture Photographic Evidence
Capturing photographic evidence of the damage is your first step towards a thorough post-flood recovery. Once the immediate dangers have subsided, grab your camera or smartphone. Begin by taking wide shots of each affected area to show the extent of the damage. This broad perspective is crucial for context before you zoom in on specific damages.
Employ basic photographic techniques to enhance the clarity of your photos. Use natural lighting whenever possible, and avoid using flash, which can create glare and obscure details. Take multiple shots from different angles to capture all aspects of the damage. This isn’t just about snapping pictures—it’s about preserving evidence. Each photo should be clear and detailed, ensuring that nothing is left ambiguous.
Remember to photograph areas that mightn’t seem damaged at first glance. Water can seep into hidden spaces, causing problems that aren’t immediately visible. Documenting these less obvious areas is essential for comprehensive damage assessment.
Finally, organize your photos systematically. Label each image with the date and the specific location within your property. This organizational effort will be invaluable when you’re dealing with insurance claims and contractors.
It’s not just about documenting the destruction—it’s about paving the way for recovery and rebuilding your sense of community.
Itemize Lost Property
After you’ve documented the extent of the flood damage with photos, your next step is to itemize the property that was lost or damaged. This detailed lost item inventory is crucial for your insurance claims and for your peace of mind. You’re not alone in this; every item counts towards rebuilding your life.
Start by listing each item, noting its condition and whether it’s salvageable. Here’s how you can structure your inventory:
| Item | Condition | Salvageable? |
|---|---|---|
| Family Photo Album | Water-damaged | No |
| Living Room Sofa | Soaked | Maybe |
| Kitchen Table | Scratched | Yes |
| Laptop | Destroyed | No |
This table isn’t just a list; it’s a record of what you’ve endured and what you may still recover. During your salvageable property assessment, be honest about the state of each item. It’s tough to let go, but also a step toward recovery.
Record Repair Estimates
Documenting your repair estimates is a critical next step in the recovery process. After a flood, it’s vital to assess the extent of damage to your property and accurately record the repair costs. Start by contacting several reputable contractors to obtain detailed written estimates. These documents aren’t just quotations; they’re your roadmap to restoring your home and a crucial part of your insurance claim.
When selecting a contractor, don’t just consider the cost. Look at their experience with flood repairs, their reputation in the community, and their responsiveness to your inquiries. Remember, the lowest bid isn’t always the best option, as quality and reliability are paramount.
Ensure each contractor visits your property to assess the damage firsthand. This ensures their estimates are comprehensive and tailored to your specific needs.
Once you’ve gathered your estimates, carefully compare them. Check what each includes and excludes and how they address the timeline for repairs. It’s important that you feel included in this process—after all, it’s your home at stake.
This careful documentation and contractor selection will empower you to make informed decisions, ensuring a thorough and efficient recovery. Your vigilance now will pave the way for a smoother rebuilding phase.
Contact Your Insurance Company
After documenting the damage to your property, your next step is to contact your insurance company to understand your policy’s coverage.
You’ll need to know what’s covered under your policy and any applicable deductibles or exclusions that might affect your claim.
Familiarize yourself with the claim filing process to ensure you meet all requirements and deadlines, which will expedite your recovery.
Documenting Property Damage
It’s crucial that you promptly contact your insurance company to begin documenting property damage following a flood.
After notifying them, you’ll need to start the insurance documentation process, which is vital for your claim. They’ll guide you through the steps to assess the damage accurately.
Begin by taking detailed photos and videos of all affected areas. Capture multiple angles to ensure that nothing is overlooked.
It’s also helpful to make a list of damaged or lost items. Be as specific as possible—note down model numbers, brands, and even estimated values if you can. This level of detail will strengthen your damage assessment and aid the adjuster in processing your claim more efficiently.
Keep all receipts related to temporary repairs or safety measures you’ve had to undertake; these are part of your insurance documentation.
If you’ve made purchases to protect your property from further damage, like sandbags or plywood, include these receipts as well.
Understanding Policy Coverage
Once you’ve documented the initial damage, you’ll want to thoroughly understand the specifics of your policy coverage by contacting your insurance company. It’s essential to know what your policy covers, where it sets boundaries, and what it excludes.
Understanding your policy limits and any coverage exclusions is key to setting realistic expectations for the recovery process. You’re not just a policy number; you’re part of a community that the insurance is there to support. Here’s a quick guide to help you focus your conversation with your insurer:
| Key Aspect | Questions to Ask | Why It Matters |
|---|---|---|
| Policy Limits | What is the maximum coverage amount? | Ensures you know the financial cap of support. |
| Coverage Exclusions | What types of damage are not covered by my policy? | Helps identify any gaps in your protection. |
| Deductibles | How much will I need to pay out-of-pocket first? | Prepares you for immediate financial impact. |
This table serves as a starting point. When you call, be ready to discuss these points in detail. Understanding these aspects ensures you’re well-prepared and can advocate for yourself effectively during this stressful time.
Claim Filing Process
Contacting your insurance company marks the beginning of the claim filing process, a crucial step in securing the funds necessary for recovery. As you reach out, you’re not just a policy number; you’re a community member in need, deserving prompt and fair treatment.
First, ensure you understand the claim requirements. These typically include providing a detailed list of damaged or lost items, evidence of the damage, such as photos or videos, and a copy of the police report, if available. Knowing these requirements upfront can save you time and help expedite your claim.
Next, be aware of the filing timeline. Most policies require that claims be filed within a specific time frame after the event. Don’t delay; initiating this process quickly is essential. You’re part of a larger group facing similar challenges, and the sooner everyone moves forward, the faster the community can begin to heal.
Prepare all necessary documentation meticulously and keep copies for your records. If you encounter difficulties or have questions, don’t hesitate to ask for clarification. Remember, your insurer is there to assist you, and it’s their role to help you navigate through this trying time with as much ease as possible.
Wear Protective Gear
Before stepping into a flood-damaged area, make sure you’re decked out in the appropriate protective gear. You’re not just repairing a building; you’re ensuring your own safety first. This is your community, your space, and taking these precautions means protecting yourself and those around you.
Wearing the right safety equipment isn’t just a recommendation—it’s a must. Start with durable, waterproof boots. Floodwaters can hide nails, broken glass, and other hazards, so thick soles and high coverage are essential to prevent injuries.
Don’t forget gloves. Heavy-duty gloves will shield your hands from sharp objects and prevent contact with potentially contaminated water.
Your protective clothing should include long pants and a long-sleeved shirt made from thick, puncture-resistant material. This isn’t the time for shorts or light fabrics. You’re part of a community coming together to rebuild, and every precaution you take keeps everyone safer.
A hard hat and safety goggles are non-negotiable. When dealing with unstable structures, falling debris can be a real danger. These items provide an added layer of defense against unexpected accidents.
Also, consider a face mask or respirator, especially in environments where mold or other airborne contaminants might’ve proliferated after the flood.
Start Water Extraction
Once you’ve suited up in your protective gear, it’s crucial to begin the water extraction process without delay.
Start by employing immediate water removal techniques such as using submersible pumps and wet vacuums to clear standing water efficiently.
Next, focus on effective drying strategies, including the use of dehumidifiers and air movers to prevent mold growth and further damage.
Immediate Water Removal Techniques
If you’re facing the aftermath of a flood, initiating water extraction immediately can mitigate further damage to your property.
It’s crucial to understand the range of water removal methods available and the flood response equipment that can assist you in these challenging times. You’re not alone—many have navigated this path and found effective solutions.
First, assess the extent of water infiltration. Use a gas-powered pump or a submersible pump, ideal for removing high levels of water efficiently.
Ensure the pump is fully submerged to maximize its effectiveness. These pumps can be rented from local hardware stores or through disaster recovery services.
Next, consider using wet/dry vacuums for areas that are less inundated. These vacuums can handle smaller volumes of water and are perfect for tackling water in hard-to-reach spaces.
Move systematically from room to room, focusing on areas that are most affected.
Additionally, employ portable flood response equipment like automatic floodwater ejectors. These tools activate automatically when water reaches a certain level, helping to maintain control over the situation even when you’re not constantly monitoring.
Effective Drying Strategies
After successfully removing the bulk of the floodwater from your property, it’s imperative to start the drying process as soon as possible to prevent mold growth and further structural damage. This crucial step is where dehumidifier use and enhancing air circulation comes into play.
Deploying dehumidifiers effectively can expedite the drying process. Position them strategically throughout the affected areas to maximize moisture extraction. Remember, it’s not just about placing them; it’s about placing them where they’ll do the most good.
Improving air circulation is equally important. Open windows and use fans to create a cross flow that helps carry the moist air out of your home. This method works hand in hand with dehumidifiers to dry out your space efficiently.
Here’s a simple guide to help you set up:
| Equipment | Placement Tips |
|---|---|
| Dehumidifiers | Near walls with visible dampness |
| Fans | Opposite each other for optimal airflow |
| Windows | Open all accessible windows |
| Air Movers | Directed at wet surfaces for fast-drying |
You’re part of a community that thrives by looking after each other. Sharing these practical steps helps everyone to recover faster and stronger. Stick to these guidelines, check the setup regularly, and adjust as necessary to ensure the best drying conditions.
Dispose of Ruined Materials
As you assess the aftermath of the flood, it’s crucial to prioritize the disposal of ruined materials. Sorting through the damaged property, you’ll identify which items can’t be salvaged. It’s vital to dispose of these materials properly to ensure your safety and facilitate the recovery process.
Firstly, separate hazardous waste from non-hazardous debris. Floods can contaminate materials with toxic substances, making them hazardous. Items like oil, paint, and chemicals require special disposal methods. Check with your local waste management services to find designated drop-off points for hazardous materials. They’ll guide you on how to safely package these items to prevent any risk of contamination or injury.
For non-hazardous items such as wet carpeting, broken furniture, and spoiled food, you’ll need to follow your community’s guidelines on bulk waste disposal. Many areas provide specific instructions for flood-damaged goods, often including curbside pickup services. Ensure you’re aware of the pickup schedules and the type of waste accepted.
Additionally, consider renting a dumpster for large quantities of debris. This can be a cost-effective and efficient way to handle large-scale disposal, especially if you’re dealing with extensive damage. Companies often offer various sizes and will assist in choosing the right one for your needs.
Clean and Disinfect
Once you’ve disposed of all damaged materials, it’s essential to thoroughly clean and disinfect your property to prevent mold growth and eliminate health hazards. This step isn’t just about tidiness; it’s crucial for your health and the structural integrity of your home.
Start by scrubbing all surfaces with soap and warm water. Pay special attention to corners and hidden areas where mold loves to hide.
Once scrubbing is done, it’s time for a more aggressive approach against potential contaminants. Use a solution of one cup of bleach mixed with one gallon of water. This strong disinfectant will help kill any remaining bacteria and viruses that could pose health risks.
Do remember, though, to wear gloves and a mask while handling bleach to protect your skin and lungs from harsh chemicals. Also, make sure your space is well-ventilated during the cleaning process to avoid inhaling fumes.
For soft surfaces such as sofas and curtains that survived the flood, consider steam cleaning. This method removes dirt and odors and kills most pathogens, contributing significantly to your overall mold prevention efforts.
Throughout this process, keep in mind that every step you take brings you closer to reclaiming your home from the chaos brought by the flood.
You’re not just cleaning up; you’re actively protecting your family’s health and ensuring that your home remains a safe haven. With diligence and thoroughness, you can restore your space and move past the disruption into recovery and renewal.
Dry Out Affected Areas
Now that you’ve cleaned and disinfected your home, it’s crucial to thoroughly dry out all affected areas to prevent mold and structural damage. Moisture control is your new priority, and it’s something you can manage with the right strategy.
Start by using dehumidifiers and fans to enhance air circulation. Position these tools strategically throughout your home, especially in areas where water is most pervasive. This setup isn’t just about moving air; it’s about creating an environment where moisture can’t survive.
Ensure that every corner of your room gets airflow, as stagnant pockets can become breeding grounds for mold. Opening windows can also aid in this process, but only if the humidity outside is lower than inside. If it’s more humid outdoors, keep windows closed to prevent additional moisture from entering. This balance is key in effectively drying out your home.
Next, focus on drying out porous materials such as carpets, furniture, and drywall. These items can absorb a significant amount of water and require attention to detail. Consider removing carpets to expose the subflooring to air circulation if they are soaked.
For furniture and drywall, use fans directed at these areas but monitor them closely to avoid any further damage from excessive airflow.
Check Electrical Systems
Before you re-energize your home, it’s essential to carefully check all electrical systems for safety. After a flood, the risk of electrical hazards can significantly increase, and ensuring your family’s safety is crucial. Here’s how you can proceed with a thorough check to maintain electrical safety and conduct a proper circuit inspection.
Firstly, don’t rush to turn the power back on. Check that the area is completely dry, including appliances and electrical outlets. Water and electricity are a dangerous mix, and your vigilance can prevent severe accidents.
Key Steps for Checking Your Electrical Systems:
- Inspect Electrical Outlets: Look for any signs of water damage or residue. If you find moisture or mud in the outlets, it’s a clear sign they need professional attention.
- Examine Your Circuit Breaker: Ensure your circuit breaker hasn’t suffered any damage. If flood water has reached it, don’t attempt to turn it back on yourself. Contact a professional electrician.
- Test GFCI Outlets: Once it’s safe, test all Ground Fault Circuit Interrupter (GFCI) outlets. Press the test button; the outlet should shut off immediately. If it doesn’t, it’s likely damaged and requires replacement.
- Look for Corrosion or Damage in Wires: Examine exposed wires for any signs of corrosion or other damage. Even slight discoloration or brittleness can indicate serious issues that need addressing.
Plan Repairs and Renovations
After assessing and addressing electrical safety, it’s crucial to plan your home’s repairs and renovations carefully. It’s not just about fixing things; it’s about creating a safe and comforting space where you can feel secure and connected to your community once again.
Start by developing a clear renovation timeline. This will help you manage both your expectations and your budget. Prioritize the repairs that ensure the structural integrity and livability of your home. Typically, these include fixing the roof, walls, and floors. You don’t want to face another setback by ignoring something that might cause more damage later.
Next, focus on areas prone to moisture, like bathrooms and kitchens. Mold can pose a significant health risk, so it’s essential to address these areas swiftly. Ensure that all renovations follow local building codes and standards to comply with regulations and ensure your home’s resilience against future disasters.
As you plan, consider incorporating modern materials and methods that offer better protection against moisture and mold. Engage with professionals who’ve experience in post-flood renovations. Their expertise will be invaluable in executing the repairs and advising on potential improvements that could benefit your home in the long run.
Lastly, keep your community informed of your progress. Sharing your renovation journey can provide encouragement and support from others who might be going through similar challenges. It’s a collective step towards recovery, reinforcing the bonds within your community as everyone rebuilds and heals together.
Recap
Now that you’ve tackled the essentials of flood recovery, you’re not out of the woods yet. Keep a close eye on the progress and adjust your approach as needed. Remember, rebuilding takes time and patience. Stay vigilant, keep your spirits up, and lean on your community for support. By following these steps diligently, you’ll restore your home and peace of mind. It’s a long haul, but you’ve got the blueprint for success.
Recent Posts
Why Follow These Steps for Water Damage Restoration?
When facing water damage, it’s essential to follow a structured approach to restoration. Each step,
Five Steps for Successful Water Damage Recovery
When faced with water damage, your response must be methodical and precise. Start by evaluating
What Are Nearby Burst Pipe Repair Services?
When a burst pipe occurs, it’s essential to act quickly. Local emergency plumbers specialize in