Contents
When dealing with property damage, your initial steps can significantly influence the water damage restoration outcome. You’ll need to quickly assess the extent of water or fire damage and decide on the most effective drying and cleaning methods. Techniques like rapid structural drying and thermal imaging play a crucial role in mitigating further damage. What you might not have considered, however, is how these strategies differ based on the specific type of damage encountered. Knowing this can dramatically affect the restoration process’s success.
Key Takeaways
- Utilize soot removal and ventilation to mitigate initial fire damage and prevent long-term odor issues.
- Employ thermal imaging and moisture detection tools for effective water extraction and to prevent mold growth.
- Implement structural assessments and reinforcements to ensure the long-term safety and integrity of the property.
- Use EPA-approved disinfectants and deep-cleaning techniques to sanitize and restore affected areas.
- Combine dehumidification processes with strategic airflow management to accelerate drying and restore comfortable humidity levels.
Assessing Fire Damage Impact
When assessing the impact of fire damage, it’s crucial to start by evaluating the structural integrity of your property. This initial step, known as a structural evaluation, forms the basis of a comprehensive fire damage assessment. You’re checking for visible damage and ensuring that your home or business is safe to inhabit.
Firstly, check for any signs of structural weakening. Look at the load-bearing walls and beams. Are there any signs of charring or warping? It’s essential to identify these areas because they play a critical role in supporting your building. If you’re not sure what to look for, it’s a wise idea to bring in a structural engineer who can provide a professional assessment.
Next, examine the foundation. Fire and heat can cause foundations to crack or shift. Notice any new cracks or unevenness in your flooring, as these could be indications of underlying issues. Again, if this seems beyond your expertise, professional help can make a significant difference in accurately assessing these risks.
Remember, your safety and the safety of those around you are paramount. Don’t rush this process. Taking the time to thoroughly assess and address these critical areas ensures safety and fosters a sense of security and belonging among your family or team members.
They’ll appreciate the care and thoroughness you put into ensuring everyone’s safety.
Initial Fire Damage Mitigation
Immediately after assessing the fire damage, you should start mitigating any further damage to protect your property. First off, ensure that the structure is safe to enter. If you’re unsure, it’s best to wait for a professional evaluation. Remember, your safety is the top priority.
Once it’s safe, begin by removing soot and smoke residues to prevent them from setting onto surfaces. You’ll need to wear protective gear, including gloves, masks, and goggles, to safeguard yourself from harmful particles. Start from the top down, cleaning ceilings first and working your way to the floors.
Next, ventilate the area well to clear out smoke odors and chemical fumes. Open all windows and use fans to circulate the air. Good ventilation helps in reducing the airborne contaminants, and it’s essential for both your safety and the ongoing recovery process.
Secure the property to prevent any unauthorized access. This helps in avoiding theft and ensures that no one else is put at risk by entering an unsafe area. You’re part of a community, and looking out for each other is key.
Lastly, document all damages for insurance purposes. Take photographs and make a list of all damaged items. This record-keeping will be crucial for your insurance claim and will help in the restoration process.
Fire safety and emergency planning aren’t just about reacting and being prepared. As you work through these initial steps, you’re taking care of your property and learning valuable lessons in resilience and readiness.
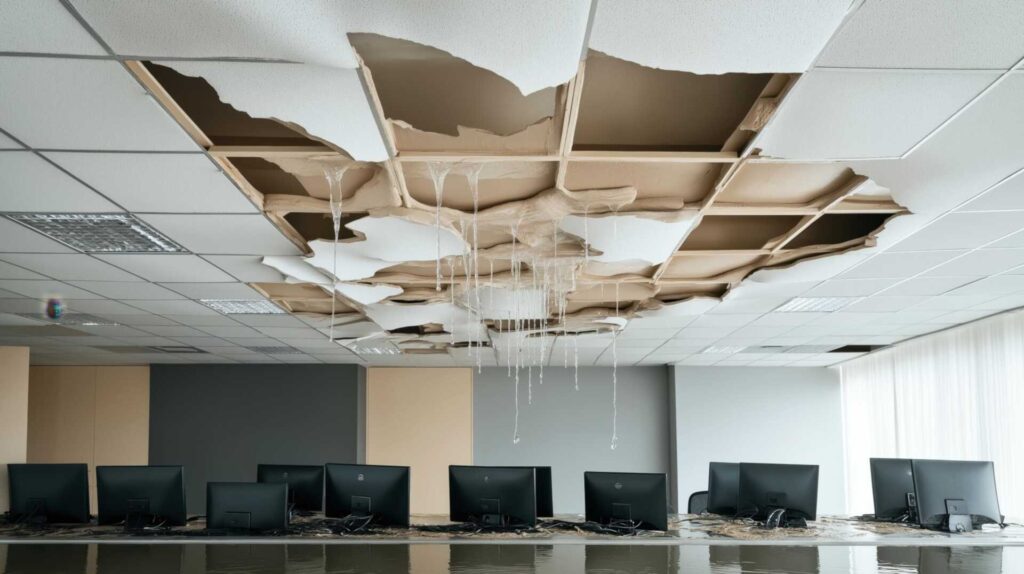
Water Extraction Techniques
To effectively tackle water damage, you’ll need to focus on efficient drying strategies first.
Utilizing advanced moisture detection tools will help you pinpoint the exact areas that require immediate attention, ensuring no moisture is overlooked.
This approach minimizes further damage and speeds up the overall restoration process.
Efficient Drying Strategies
Kick off your water damage recovery by employing efficient drying strategies, which are crucial for mitigating further damage and preventing mold growth.
You’ll want to start by mastering airflow management. Positioning fans strategically throughout the affected area can significantly enhance the drying process. Ensure that these fans circulate air effectively, covering all damp spots, especially those hidden in corners or behind furniture.
Next, integrate thermal imaging into your approach. This technology isn’t just high-tech flair; it’s a practical tool that helps you identify the wettest areas that are often invisible to the naked eye. By pinpointing these spots, you can direct your drying efforts more efficiently, making sure no soggy patch goes untreated.
Remember, the key here is to dry the surface and ensure deep moisture is eradicated. Arrange your fans to create a dynamic flow of air that reaches deep into wall cavities, under floorboards, and above ceilings.
It’s about being thorough and not just quick.
Advanced Moisture Detection
Once you’ve set up your drying strategies, it’s crucial to advance to sophisticated moisture detection techniques for thorough water extraction. Moisture mapping and infrared thermography are your best allies in this pursuit. By understanding where moisture hides, you’re not just drying; you’re restoring your space to a safe, welcoming environment.
Moisture mapping involves detailed assessments to visualize the extent of water penetration. This method helps you prioritize areas needing urgent attention and monitor drying progress effectively. It’s like having a roadmap in an unfamiliar city—both reassuring and essential.
Infrared thermography, on the other hand, allows you to see beyond what’s visible by detecting temperature variations. These variations often indicate moisture presence that would otherwise go unnoticed. With this technology, you’re equipped to tackle hidden damp spots that could lead to mold or structural damage.
Here’s a quick guide to get you started:
| Technique | Purpose | Benefit |
|---|---|---|
| Moisture Mapping | Visualize water penetration | Prioritize and monitor drying areas |
| Infrared Thermography | Detect hidden moisture through temperature differences | Identify potential problem areas early |
| Combined Approach | Integrated assessment | Comprehensive and efficient restoration |
Dehumidification Processes
As you tackle the aftermath of water damage, choosing the right type of dehumidifier is crucial; options range from refrigerant to desiccant models, each suited for different humidity levels and temperatures.
To enhance the efficiency of your dehumidification process, ensure you’re regularly maintaining your equipment and optimizing airflow in the affected areas.
Additionally, keep a close eye on humidity levels with hygrometers to monitor the environment and adjust your approach as necessary.
Types of Dehumidifiers
Understanding the different types of dehumidifiers is crucial for effectively managing moisture in environments affected by water damage. You’ll find that the two main types, desiccant dehumidifiers and refrigerant dehumidifiers, each have unique benefits depending on your specific needs.
Desiccant dehumidifiers work by absorbing moisture from the air using a desiccant material like silica gel. They’re particularly effective in colder environments since their efficiency isn’t compromised by lower temperatures. This makes them ideal if you’re dealing with dampness in chilly settings.
On the other hand, refrigerant dehumidifiers operate by cooling air to remove moisture. The air passes over cold coils, condensing the moisture, which is then collected in a tank. These units are more suited to warmer, humid conditions and are often used in residential and commercial buildings after flooding.
Here’s a quick comparison to help you decide:
| Type | Best For | Consideration |
|---|---|---|
| Desiccant | Cold environments | Less energy-efficient in warmth |
| Refrigerant | Warm, humid areas | Not effective in cold |
Choosing the right dehumidifier isn’t just about drying out a space; it’s about restoring your environment. Whether you’re bouncing back from a flood or tackling condensation, picking the right type means you can efficiently manage moisture and prevent further damage.
Dehumidification Efficiency Tips
To maximize the efficiency of your dehumidifier and speed up the restoration process, it’s essential to implement a few strategic practices.
First, ensure that your dehumidification technology is correctly sized for the space you’re treating. An undersized unit will struggle, while an oversized one can cycle off too quickly, not allowing for effective humidity control.
Position your dehumidifier in a central location where air can circulate freely around it. Avoid placing it against walls or furniture, which can restrict airflow and reduce efficiency.
Make sure the space is as sealed as possible from outside moisture; close all windows and doors in the area being treated. This containment prevents additional humid air from compromising the dehumidification process.
Regularly check and clean the filters in your dehumidifier. Clogged filters restrict airflow, forcing the unit to work harder and less efficiently. This speeds up the wear and tear on your device and diminishes its overall performance.
Lastly, don’t underestimate the value of maintenance. Regular checks ensure optimal function and prevent potential issues that could impede progress in restoring your space.
Monitoring Humidity Levels
After implementing the best practices for dehumidification, it’s important to monitor humidity levels to ensure your efforts are effective. You’re restoring a space and reclaiming a part of your life, and maintaining optimal humidity is crucial for both the structure and your comfort.
Start by integrating reliable humidity control systems. These aren’t just tools; they’re your allies in safeguarding your restored environment. Place humidity sensors in various parts of the building, especially in areas most affected by water damage. This isn’t just about checking a box; it’s about creating a consistently safe space where you can feel secure and at ease.
Regularly check these sensors and record the readings. If you notice fluctuations or levels rising above 60%, it’s time to reassess your dehumidification setup. This level of moisture monitoring helps you catch potential issues before they escalate, reinforcing your peace of mind.
Don’t forget that managing humidity isn’t a one-time task but an ongoing commitment to your restored space. Involve a professional if you’re unsure about the readings or adjustments needed. They’re part of your community, ready to help you maintain the sanctuary you’ve worked hard to restore.
Handling Smoke and Soot
When dealing with smoke and soot damage, it’s crucial to act swiftly to minimize long-term effects. The first steps you’ll want to take involve smoke removal and soot cleanup, which are pivotal in restoring your space to its former state.
Start by ventilating the area as much as possible. Open all windows and doors to allow fresh air to circulate, which helps in reducing smoke odor. You’ll feel more at ease knowing that the air in your home is clearing out.
Next, you should address the soot on walls, ceilings, and other surfaces. Soot can be oily and easily smear, so it’s important to treat it delicately. Use a vacuum with an upholstery attachment to gently remove soot particles from surfaces without pressing them into the material. This approach helps you avoid embedding the particles deeper, which can make them harder to remove later.
After vacuuming, it’s time to use a dry chemical sponge. This specialized tool is designed to lift soot without adding moisture, which can further embed the soot into surfaces.
Once the loose soot is removed, you’ll need to clean the surfaces with a mild soap or a solution specifically designed for soot removal. Apply the cleaner with a sponge, working in a wiping motion that moves from top to bottom to prevent streaking.
Rinse the area with clean water and dry it thoroughly to avoid any moisture-related issues. Remember, being thorough now means you’re setting yourself up for fewer problems down the road.
Sanitizing Affected Areas
Now that you’ve managed smoke and soot cleanup, it’s important to focus on sanitizing the affected areas to ensure a safe, clean environment. This next step is crucial for your health and the overall recovery of your space.
Begin by ventilating the area well. Open windows and use fans to circulate fresh air, which helps reduce the concentration of airborne contaminants. You’re cleaning and fostering a sense of renewal and safety in your space.
Focus on sanitizing surfaces thoroughly. Use EPA-approved disinfectants that are suitable for the types of surfaces you’re treating. Hard surfaces such as countertops, door handles, and fixtures need special attention. Apply the disinfectant according to the manufacturer’s directions and allow it to sit for the recommended time to effectively kill germs and bacteria.
Don’t overlook soft materials. Carpets, curtains, and upholstery can harbor smoke particles and microbial growth. These should be deep-cleaned using steam cleaners or, in some cases, may need professional treatment. You’re not just restoring your home; you’re reclaiming your sanctuary from the chaos of damage.
Lastly, address any items that are frequently touched. Disinfecting materials such as light switches, remote controls, and phones ensures that every aspect of your living environment is clean and safe. Remember, every detail matters in building back a healthy home environment.
You’re not alone in this. We’re here to guide you every step of the way to make sure your home is restored and a place where you truly belong, safe and secure amidst the trials.
Restoring Structural Integrity
Restoring the structural integrity of your home is essential to ensure safety and stability following fire and water damage. Structural integrity is about making your home stand and returning it to a place where memories can continue to be safely made.
Here’s how you can tackle this vital restoration phase.
First, conduct a thorough structural assessment. This step determines the extent of the damage and pinpoints critical areas that need immediate attention. Engage a professional to ensure this is done accurately. They’ll look for signs of stress, such as cracks in the walls or a sagging roof, which indicate where repairs are crucial.
Next, let’s delve into some key repair techniques:
Reinforcement of weakened structures: Use beams and other support structures to reinforce weakened areas. This prevents further deterioration and boosts the overall strength of your home.
Replacement of damaged components: Sometimes, the best way to restore integrity is to replace compromised structural elements like beams, joists, or sections of flooring.
Utilization of advanced materials: Modern materials such as steel reinforcements or specially treated woods offer greater resistance against future incidents.
Regular monitoring and adjustments: After repairs, keep an eye on the restored areas. Adjustments might be needed as the structure settles or new stress points emerge.
Preventative Measures for Future Risks
After repairing and reinforcing your home’s structure, it’s important to focus on minimizing future damage. You’re not just restoring your house; you’re fortifying a safe haven for you and your loved ones.
Let’s explore some practical steps to safeguard your sanctuary against potential disasters.
Firstly, conduct regular risk assessments and safety inspections. These aren’t just checkboxes on a list but are crucial in identifying vulnerabilities in your home’s defense against fire and water hazards.
Engage professionals to review your electrical systems and plumbing to ensure they meet current safety standards.
Install smoke detectors in key areas and test them monthly. Don’t overlook the importance of fire alarms; they’re your first line of defense in alerting you to danger.
Similarly, investing in efficient water barriers and a robust drainage system can significantly mitigate the risk of water damage. Ensure that your gutters are clear and that your property’s slope directs water away from the foundation.
Review your landscaping choices. Opt for materials and plants that are resistant to fire and promote good drainage. This dual approach enhances your home’s safety and contributes to its aesthetic appeal.
Emergency plans are essential. Make sure every family member knows what to do in case of a fire or flood. Regular drills can make a big difference in emergency situations.
Finally, regularly review your insurance to ensure it covers the realities of new risks. Adequate coverage provides peace of mind, securing not just a physical structure but a sense of stability for your family.
Wrap-Up
Restoring your home after fire or water damage can be daunting, yet it’s crucial. Prioritize removing soot, managing moisture, and sanitizing thoroughly. Reinforce structural elements and consider preventative upgrades to safeguard your home. By embracing these steps, you’ll repair and enhance your home’s durability against potential disasters. Take action now for peace of mind later.
Recent Posts
What Steps to Follow for Commercial Flood Cleanup?
Commercial Flood Cleanup requires a structured approach to protect your property, employees, and business operations.
What to Know About Emergency Water Damage Restoration?
Emergency Water Damage requires immediate attention and a structured response to prevent further property damage.
Steps for Emergency Water Damage Restoration
When faced with emergency water damage, your first priority is to ensure safety. You need